DiPlus-to-hass: интегрируем BYD в Home Assistant DiPlus-to-hass: integrate your BYD into Home Assistant
Итак, я всё-таки получил то, чего мне так долго хотелось, — а именно интеграцию своего BYD Song PRO в Home Assistant. Теперь можно настраивать автоматизации: как в доме (по событиям и состоянию авто), так и в самом авто менять настройки и автоматизировать то, о чём раньше только мечтал — пока через HA, но в будущем допилю Tasker прямо в программе-компаньоне на вашем авто. Об этом — чуть позже. I finally got what I wanted for a long time — integration of my BYD Song PRO into Home Assistant. Now I can build automations at home based on car events and state, and even change car settings remotely. For now this is done through HA; later I plan to add Tasker-like rules directly in the companion app. More on that later.

Что мы имеем? What do you need?
- Неудержимое желание получить телеметрию вашего авто в умном доме. A strong desire to get your car's telemetry into your smart home.
- Автомобиль BYD с корректно установленным DiPlus (желательно версии 1.3.8-beta18 или новее — скачать APK) и активированным ADB. A BYD vehicle with a properly installed DiPlus app (preferably 1.3.8-beta18 or newer — download APK). ADB is only needed for advanced installation/debugging.
-
Умный дом на базе Home Assistant и доступ к папке
custom_components. A Home Assistant setup with access to thecustom_componentsfolder. - Флешку и возможность установить программу на головное устройство (ГУ) авто. Соответственно, DiPlus уже должен быть установлен. A USB flash drive and the ability to install an app on the car's head unit. DiPlus must already be installed.
Что умеет интеграция? What can the integration do?
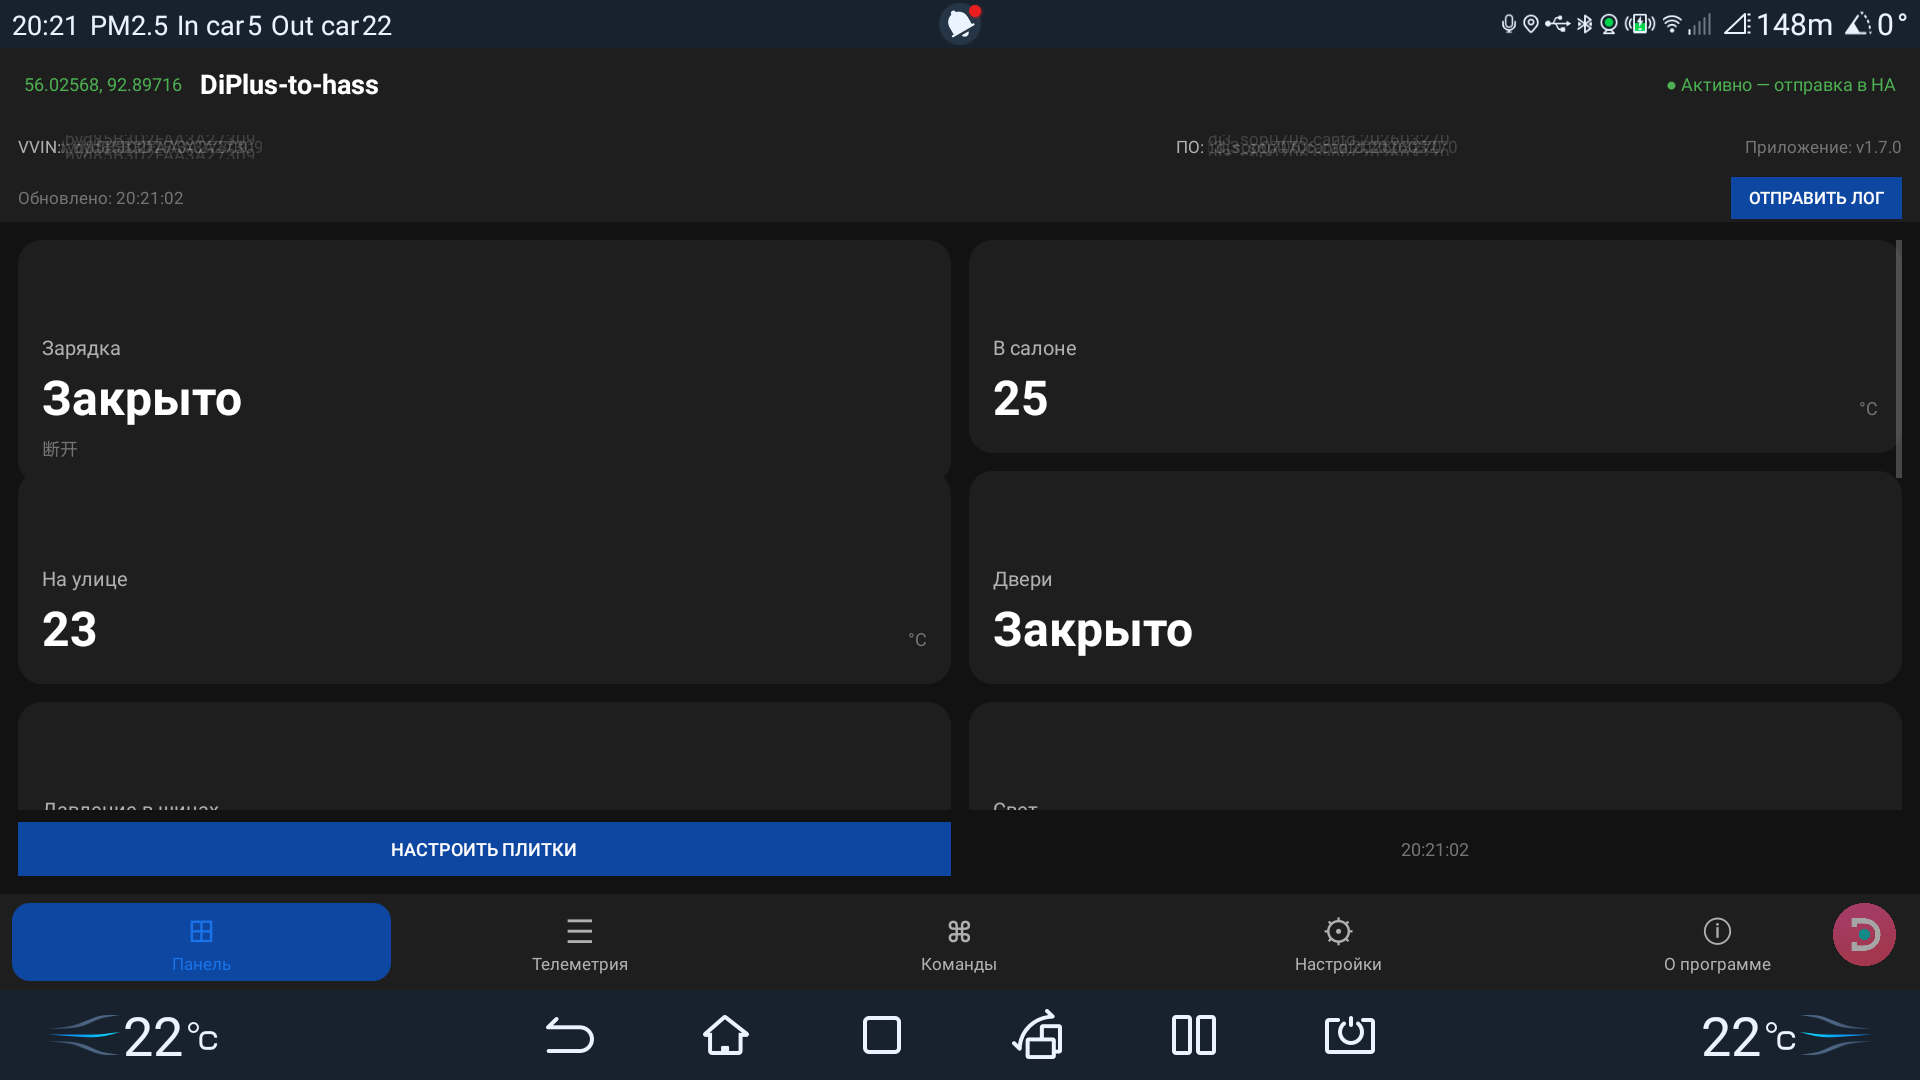
- Передаёт более 130 сигналов авто: скорость, SOC, пробег, давление в шинах, температуры батареи и салона, двери, замки, свет, ADAS и другие. Forwards more than 130 vehicle signals: speed, SOC, range, tyre pressure, battery and cabin temperatures, doors, locks, lights, ADAS and more.
-
Отправляет GPS-координаты автомобиля в HA как
device_tracker. Sends the car's GPS coordinates to HA as adevice_tracker. - Позволяет управлять авто из HA: включать климат, менять температуру, закрывать окна, открывать багажник и многое другое (включается отдельно в настройках). Lets you control the car from HA: turn on climate, change temperature, close windows, open the trunk and more (must be enabled in settings).
- Работает в фоне и автозапускается при старте ГУ, кратковременно показываясь и сворачиваясь. Runs in the background and auto-starts with the head unit, briefly showing and then minimizing.
- Поддерживает русский и английский языки. Supports Russian and English.
- Позволяет выбрать, какие сигналы отправлять в HA, прямо на главном экране — с сортировкой и выбором всех. Lets you choose which signals are sent to HA directly from the main screen, with sorting and select-all.
- v1.9.1: фоновый режим при выключенном авто — продолжает собирать телеметрию и выполнять команды после ACC off. Встроенный помощник ADB-команд. v1.9.1: background mode when the car is off — keeps collecting telemetry and executing commands after ACC off. Built-in ADB command helper.
- v1.9.1: лог сразу в файл — запись на диск после старта приложения и сброс буфера при остановке сервиса. v1.9.1: immediate file logging — logs are written to disk right after app start and flushed on service shutdown.
- v1.9.0: настраиваемый дашборд — располагайте сигналы на главном экране как удобно. v1.9.0: customizable dashboard — arrange signals on the main screen as you like.
- v1.9.0: внешний реестр сигналов↔команд — новые сигналы и команды без пересборки приложения. v1.9.0: external sensor↔command registry — add new signals and commands without rebuilding the app.
- v1.9.0: фильтр отключённых сигналов — скрывайте недоступные сигналы для чистой таблицы. v1.9.0: disabled-signals filter — hide unavailable signals for a clean telemetry table.
- Ведёт подробный лог команд и ответов DiPlus с ротацией и экспортом. Keeps a detailed log of commands and DiPlus responses with rotation and export.

Порядок установки Installation steps
1. Установите интеграцию Home Assistant 1. Install the Home Assistant integration
-
Скачайте архив
diplus2hass-v1.9.2.zipс сайта teplitzky.ru/diplus2hass. Download thediplus2hass-v1.9.2.ziparchive from teplitzky.ru/diplus2hass. -
Распакуйте его. Внутри будет папка
custom_components/diplus2hass. Extract it. Inside you will findcustom_components/diplus2hass. -
Скопируйте её в конфигурацию HA:
cp -r custom_components/diplus2hass /config/custom_components/Copy it into your HA configuration:cp -r custom_components/diplus2hass /config/custom_components/ - Перезапустите Home Assistant. Restart Home Assistant.
- Перейдите в Настройки → Устройства и службы → Добавить интеграцию и выберите DiPlus-to-hass — BYD Vehicle Telemetry. Go to Settings → Devices & Services → Add integration and select DiPlus-to-hass — BYD Vehicle Telemetry.
-
Введите имя автомобиля, например
BYDSongPRO. Это же имя позже укажете в приложении. Enter the car name, for exampleBYDSongPRO. Use the same name later in the Android app.

2. Установите DiPlus-to-hass на ГУ с флешки 2. Install DiPlus-to-hass on the head unit from a USB drive
-
Скачайте
diplus2hass-v1.9.1.apkс сайта teplitzky.ru/diplus2hass на компьютер. Downloaddiplus2hass-v1.9.1.apkfrom teplitzky.ru/diplus2hass to your computer. -
Скопируйте файл
diplus2hass-v1.9.1.apkв корень USB-флешки. Copydiplus2hass-v1.9.1.apkto the root of a USB flash drive. - Вставьте флешку в USB-порт головного устройства BYD. Insert the flash drive into a USB port of the BYD head unit.
- На ГУ откройте файловый менеджер (или приложение "Проводник" / "File Manager"). On the head unit open the file manager (or "Explorer" / "File Manager").
-
Найдите флешку, откройте папку с APK и нажмите на файл
diplus2hass-v1.9.1.apk. Find the flash drive, open the APK folder and tapdiplus2hass-v1.9.1.apk. - Система предложит установить приложение. Нажмите Установить. Если появится предупреждение об установке из неизвестных источников, разрешите установку для файлового менеджера. The system will offer to install the app. Tap Install. If a warning about unknown sources appears, allow installation for the file manager.
- После установки откройте приложение и разрешите все запрошенные разрешения (местоположение, уведомления, автозапуск). After installation open the app and grant all requested permissions (location, notifications, auto-start).

3. Настройте подключение к Home Assistant 3. Configure the Home Assistant connection
- В приложении нажмите ⚙ → Настройки. In the app tap ⚙ → Settings.
-
Укажите:
Enter:
- Адрес сервера — домен или IP Home Assistant. Server address — Home Assistant domain or IP.
-
Порт — обычно
443для HTTPS или8123для HTTP. Port — usually443for HTTPS or8123for HTTP. - Long-Lived Access Token — токен из профиля пользователя HA. Long-Lived Access Token — token from the HA user profile.
- Имя автомобиля — точно такое же, как в интеграции HA. Car name — exactly the same as in the HA integration.
- Включите HTTPS, если HA работает по HTTPS. Enable HTTPS if HA uses HTTPS.
- Вернитесь на главный экран и включите переключатель Отправлять в HA. Return to the main screen and enable the Send to HA switch.
- При необходимости включите Управление авто из HA — тогда интеграция сможет отправлять команды в DiPlus. Optionally enable Control car from HA so the integration can send commands to DiPlus.

4. Настройте автозапуск и фоновую работу 4. Configure auto-start and background work
- В меню приложения откройте Настройки → Автозапуск (BYD). In the app menu open Settings → Auto start (BYD).
- В системном окне (список запрета автозапуска приложений) уберите галочку напротив DiPlus-to-hass, чтобы разрешить ему автозапускаться. In the system window (list of apps blocked from auto-start) uncheck DiPlus-to-hass to allow it to auto-start.
- Откройте Фоновая работа и добавьте приложение в белый список. Open Background activity and add the app to the whitelist.
После перезагрузки ГУ приложение кратковременно появится на экране и свернётся — так оно надёжнее удерживается в фоне. After the head unit reboots the app briefly appears on screen and then minimizes, which helps it stay alive in the background.
5. Выберите сигналы для передачи 5. Choose signals to send
На главном экране в таблице телеметрии отметьте галочками те сигналы, которые нужны в HA. Чекбокс в шапке выбирает или снимает все сразу, а клик по заголовкам столбцов сортирует таблицу. Фильтр сохраняется автоматически. On the main screen check the signals you want in HA. The header checkbox selects/deselects all, and clicking column headers sorts the table. The filter is saved automatically.
6. Включите управление авто из HA (опционально) 6. Enable car control from HA (optional)
Если хотите управлять климатом, окнами и другими функциями прямо из Home Assistant, откройте ⚙ → Настройки и включите Управление авто из HA. По умолчанию эта опция выключена для безопасности. If you want to control climate, windows and other functions directly from Home Assistant, open ⚙ → Settings and enable Control car from HA. It is disabled by default for safety.

7. Логирование и диагностика 7. Logging and diagnostics
Для отладки включите Писать подробный лог в настройках. Лог хранится в памяти, автоматически ротируется при превышении 5 МБ и может быть экспортирован в Downloads с именем, содержащим дату и время. For debugging enable Write detailed log in settings. The log is kept in memory, rotated automatically at 5 MB and can be exported to Downloads with a timestamped file name.
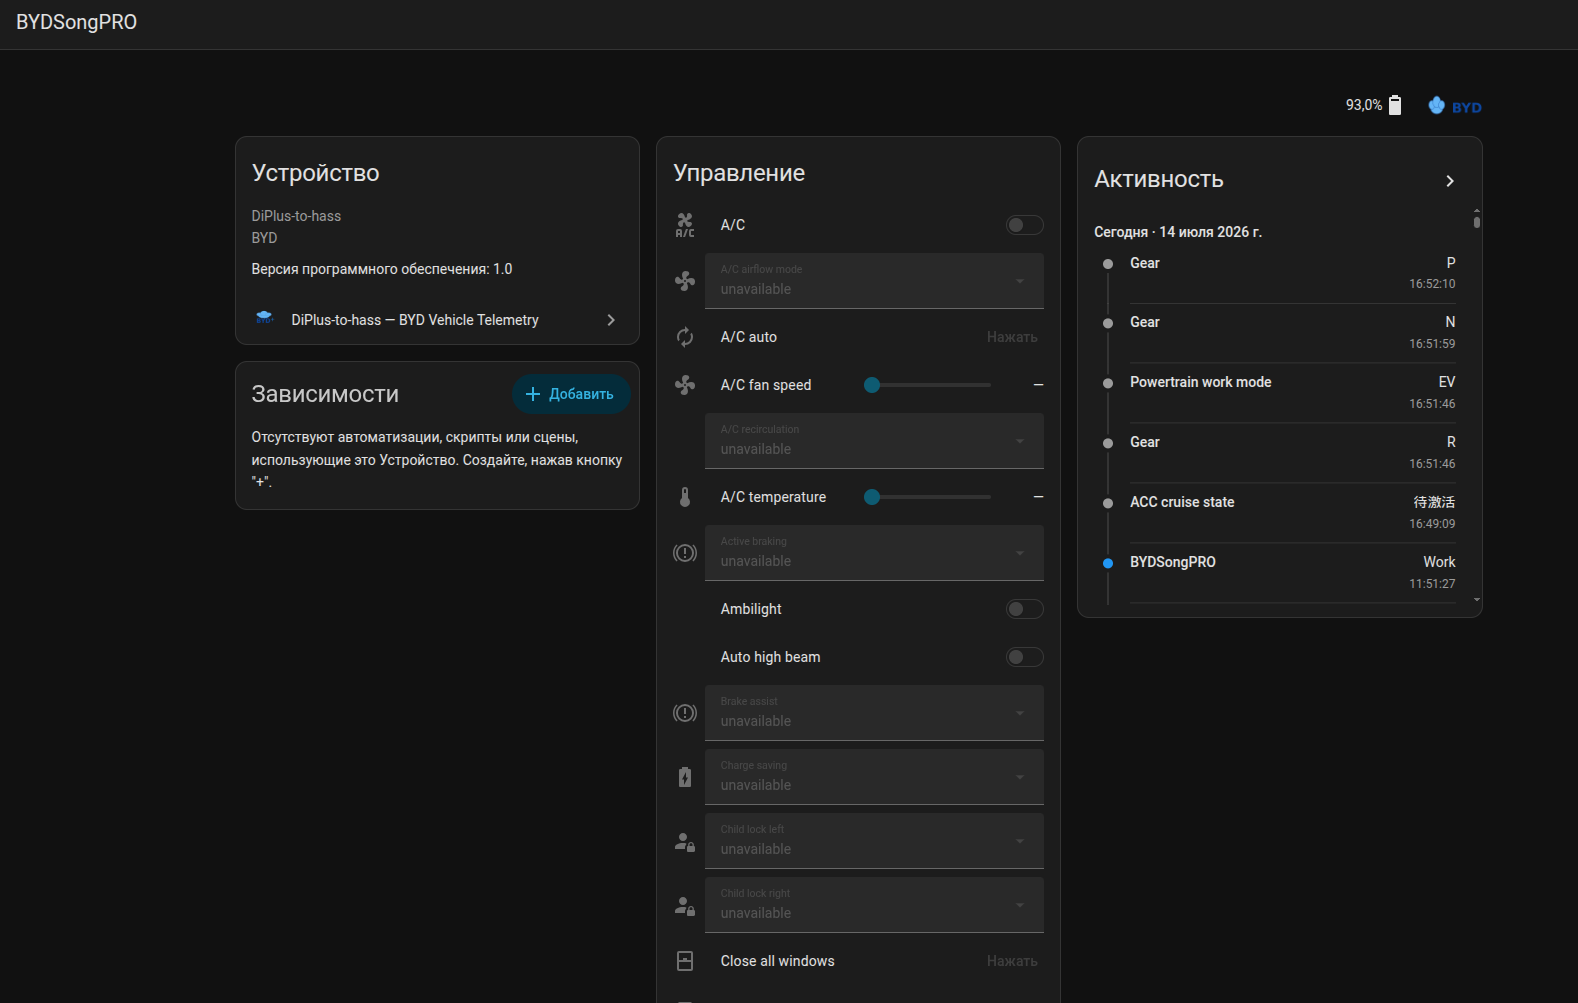
Как это выглядит в Home Assistant? What does it look like in Home Assistant?
После первой отправки данных в HA появится устройство с сенсорами, бинарными сенсорами и трекером. Можно строить автоматизации: After the first data batch arrives in HA you will see a device with sensors, binary sensors and a tracker. You can build automations such as:
- Если SOC < 20% — отправить уведомление "пора заряжаться". If SOC < 20% send a "time to charge" notification.
- Если дверь открыта — включить свет в гараже. If a door is open turn on the garage light.
- Если температура за бортом > 25 °C — включить вентиляцию сидений. If outside temperature > 25 °C turn on seat ventilation.

Что делать, если что-то не работает? Troubleshooting
- "diplus not responding" — убедитесь, что DiPlus запущен на ГУ. "diplus not responding" — make sure DiPlus is running on the head unit.
- Нет сенсоров в HA — проверьте, что имя авто в приложении совпадает с именем в интеграции, и что включён переключатель Отправлять в HA. No sensors in HA — check that the car name in the app matches the integration name and that Send to HA is enabled.
- Нет координат на карте — проверьте разрешение на местоположение и наличие GPS/сетевой геолокации. No coordinates on the map — check location permission and GPS/network geolocation availability.
- Данные не обновляются в фоне — проверьте автозапуск, разрешение на фоновую работу и оптимизацию батареи. Data not updating in the background — check auto-start, background activity permission and battery optimization.
- Команды из HA не работают — проверьте, что в настройках включено Управление авто из HA. Commands from HA do not work — check that Control car from HA is enabled in settings.
- Нужна диагностика — включите Писать подробный лог в настройках и экспортируйте лог через кнопку Экспорт лога. Need diagnostics — enable Write detailed log in settings and export the log with the Export log button.
Планы развития Roadmap
В версии v2.0.0 добавлены автоматические действия по правилам прямо в приложении. Подробнее — в отдельной статье. Version v2.0.0 introduces rule-based automatic actions directly in the app. See the dedicated article for details.
Скачать Download
- diplus2hass-v2.1.6.zipdiplus2hass-v2.1.6.zip — интеграция Home Assistant v2.1.6 — Home Assistant integration v2.1.6
- diplus2hass-v2.1.6.apkdiplus2hass-v2.1.6.apk — Android-приложение v2.1.6 — Android app v2.1.6
- diplus.1.3.8-beta18.apk — приложение DiPlus (обязательно, без него DiPlus-to-hass не работает) — DiPlus app (mandatory, DiPlus-to-hass will not work without it)
Поддержка и обсуждения — в Telegram: @BYDiPlus2HASS. Support and discussions — Telegram: @BYDiPlus2HASS.